
Falling Snow
Weekly news
We want to hear from you! Go to the 'General' section and say what you want to say. Start a new topic if you wish.Similar topics
Who is online?
In total there are 5 users online :: 0 Registered, 0 Hidden and 5 Guests None
Most users ever online was 285 on Wed Sep 22, 2021 3:07 pm
Latest topics
Statistics
We have 490 registered usersThe newest registered user is Poisonberries
Our users have posted a total of 15531 messages in 1327 subjects
Our awesome Affiliates!


Behind the Scenes - How I make Sprites
4 posters

Do you Like This Thread?
Behind the Scenes - How I make Sprites
 by Lynjabear Wed May 11, 2011 4:52 pm
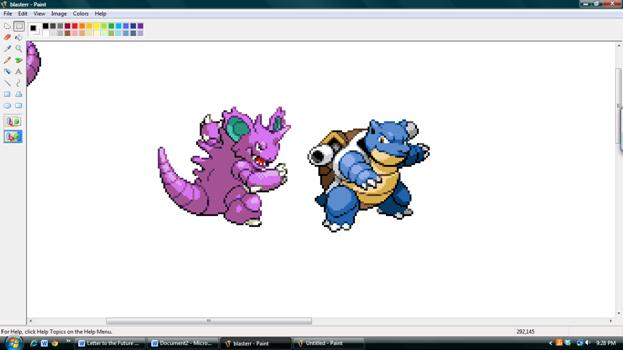
I’ve been making sprites recently, and though I’m not a professional, here is a step-by-step guide on spriting. The two Pokémon I have in this are Nidoking and Blastoise, probably not the most ideal two to make a tutorial with, but close enough. Some of this does include scratching (drawing stuff pretty much freehand) and how to recolor things. If you don’t know how to recolor, please post that, and I’ll try to make something on recoloring. All of these sprites are found simply by typing in Google images “Blastoise sprite.” A useful tip is, when using Google; always keep on clicking the image until you get the full sized. If you copy it straight off of Google and not its actual site, the quality of the sprite picture is poor. Also, copy and paste it onto Microsoft word before pasting it onto paint (I am using MS paint for this tutorial) so that the background does not become black. Although I like to dye the background black in the end, it gets rid of the black outlines, which can sometimes be messy when fusing the Pokémon.
It is also advisable that you get sprite images of the Pokémon in many different positions, so you can pick which one looks the most natural.
This fusion was done by me today , and is what I will be using step-by-step.
The computer I am working on is also fairly large, and is zoomed in on 400% zoom most of the time, 100 in the out shots and 800 in deep shots.
Note: There are progressively less pictures as the tutorial goes on. Sorry .
.

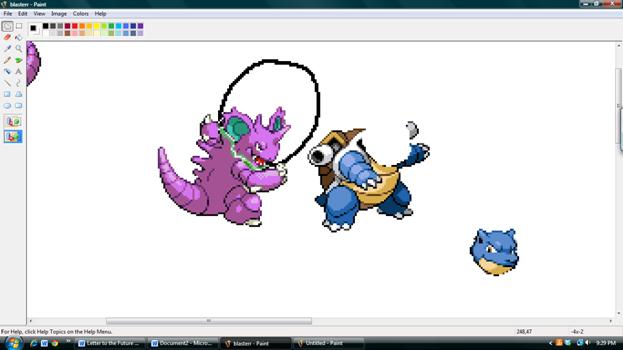
What I am doing in this picture is turning the Nidoking sprite so that it is facing the same direction as the Blastiose sprite. This makes them easier to fuse. To do these effects, go to image and use the options there as shown in the picture.
The sprites shown with flipping
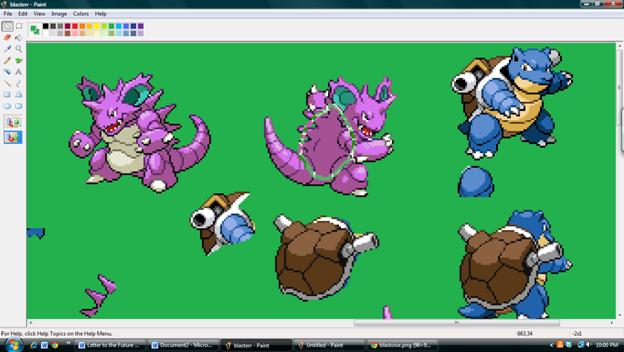
To fuse the sprites, first, you have to use your imagination. What I am doing in this picture is taking the parts I want to fuse, in this case, the heads, and then using the lasso tool in the far left to select it. Make sure that the icon on the bottom left of the screen is at the bottom, an effect that makes the background clear. The background is whatever color you right click on the palette at the top or right click with the eyedropper tool. It is always set to white, and is shown with the overlapping square icon next to the palette.

I am using Blastoise as the base of the head, or the sprite that is getting parts stuck on it. I sliced off all the parts from Nidoking’s head that I wanted to use and positioned them around the head of the Blastiose.

What I have done in this picture is dye the background green before I do any fusing. This makes it so that any white that is originally in the sprite is not treated as clear and disappear in fusion and overlapping. You can use any color in this, as long as it is not in the sprite and you make sure to right click the color you are using on the palette or with the eyedropper tool.

Now what I have done is take all of the Nidoking pieces and drag them all on top of the Blastoise face. Sometimes, in order to make it look good, you must drag the piece on the base or drag the base onto the piece depending upon whether you would like to have the piece in front of the base of behind it. You can see that I have accidentally made a black slash mark in the face, something I will fix later. It doesn’t look right as of now because of the colors, but you can recolor it later.

Here, what I have done is fixed part of the line running through Blastoise’s face and cut off the legs, which I will now fuse. Note that I have used the legs from a different Nidoking sprite than the one I took the head from.

Here, I have fused the feet by using Blastoise’s toes on nido’s legs. It doesn’t matter that one is blue and one is purple, because recoloring takes place later and I might not even use both.

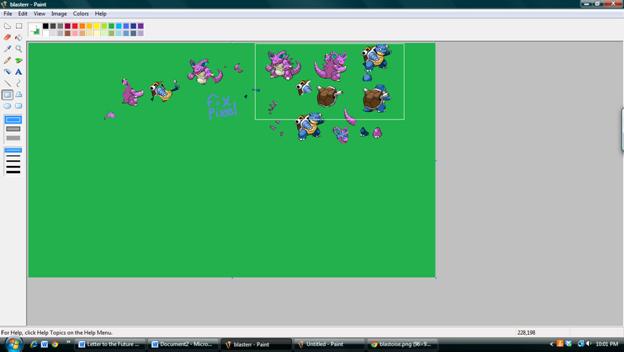
Now, what I have done is simply move all the sprite parts onto a clean space on the canvas (and I recommend using a large canvas). I have also taken Nido’s tail off in the possibility that I may use it on Blastoise’s body.

This is a view of 100% of my workspace, outlined in white.

I have cut off Blastoise’s tail, on the off chance that I do use nido’s tail instead.

Here, I have gathered all of Nidoking’s spikes to add to blastoise’s shell. A nice thing to keep in mind when spriting is to use very characteristic pieces of the Pokémon you are working with.

Here, I have just touched up the spike a little, taking out little pixels of nidoking color.
What I am going to do now is sort of create a shell to put on the back of Nidoking. These steps are kind of confusing for newer spriters (not that I have been doing this for more than a few months) and some were even made up for this sprite. What I am doing here is taking a piece of nidoking’s back so I can see about how much shell I need to use, because using the blastoise shell is too large and at the wrong angle. I lassoed the area that will be covered by the shell and copied it with ctrl before dragging it away from the nidoking sprite. Notice that I have gotten another sprite, this one with a shell facing towards you, as nidoking's back faces the viewer.
This is an 100 view of the board. (note – all the views are found by going to custom, then zoom.)

A lot of steps in one picture. What I have done is circled the Nidoking shape with the white circle tool, and then drag the white circle onto the Blastoise shell. Then, I dragged this part of the Blastoise shell onto the green background.

What I have done in this picture is draw a rough outline of the shell border around the shell. This makes it look more natural.

Here, I touched up the shell and used a black pencil to neaten up the outline.

Here, I have attached all the spikes to the blastoise shell I have made.

This is an 100 view of the picture.
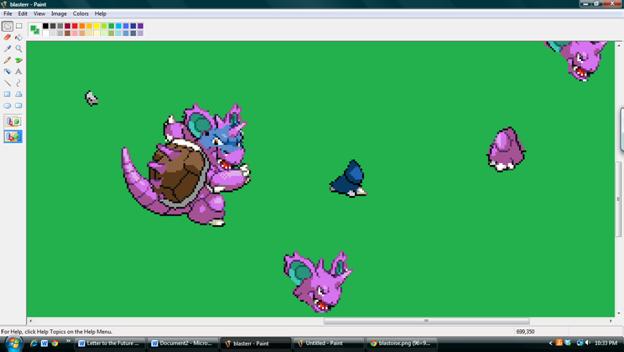
I have now attached the head to the body by first removing the old head and sticking on the new head. Not shown in a picture is me taking the blue foot and attaching it to the nidoking foot. Recoloring is not shown also.

Here, the jigglypuff in the middle is because I have taken the pink from its body as a starter This is an 200% view.

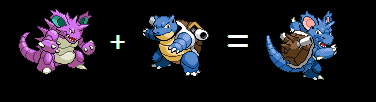
The sprite is pretty much done. I cleared all the other sprites off the page but the final fusion and the two fusees so I can make a nice equation like thing.

I got the plus and minus sign off of MS word, size 72. It is nice to use big font, because when you enlarge them on paint, they tend to lose their quality.

I dyed the background black to match the background of nightmare and just to give it a more “professional” look, but it can be any color. I also made final touchups to the sprites.
A free tutorial for sprites! (ahem rep, wink wink, nudge nudge)
Happy Spriting!
It is also advisable that you get sprite images of the Pokémon in many different positions, so you can pick which one looks the most natural.
This fusion was done by me today
, and is what I will be using step-by-step.The computer I am working on is also fairly large, and is zoomed in on 400% zoom most of the time, 100 in the out shots and 800 in deep shots.
Note: There are progressively less pictures as the tutorial goes on. Sorry
What I am doing in this picture is turning the Nidoking sprite so that it is facing the same direction as the Blastiose sprite. This makes them easier to fuse. To do these effects, go to image and use the options there as shown in the picture.
The sprites shown with flipping
To fuse the sprites, first, you have to use your imagination. What I am doing in this picture is taking the parts I want to fuse, in this case, the heads, and then using the lasso tool in the far left to select it. Make sure that the icon on the bottom left of the screen is at the bottom, an effect that makes the background clear. The background is whatever color you right click on the palette at the top or right click with the eyedropper tool. It is always set to white, and is shown with the overlapping square icon next to the palette.
I am using Blastoise as the base of the head, or the sprite that is getting parts stuck on it. I sliced off all the parts from Nidoking’s head that I wanted to use and positioned them around the head of the Blastiose.
What I have done in this picture is dye the background green before I do any fusing. This makes it so that any white that is originally in the sprite is not treated as clear and disappear in fusion and overlapping. You can use any color in this, as long as it is not in the sprite and you make sure to right click the color you are using on the palette or with the eyedropper tool.
Now what I have done is take all of the Nidoking pieces and drag them all on top of the Blastoise face. Sometimes, in order to make it look good, you must drag the piece on the base or drag the base onto the piece depending upon whether you would like to have the piece in front of the base of behind it. You can see that I have accidentally made a black slash mark in the face, something I will fix later. It doesn’t look right as of now because of the colors, but you can recolor it later.
Here, what I have done is fixed part of the line running through Blastoise’s face and cut off the legs, which I will now fuse. Note that I have used the legs from a different Nidoking sprite than the one I took the head from.
Here, I have fused the feet by using Blastoise’s toes on nido’s legs. It doesn’t matter that one is blue and one is purple, because recoloring takes place later and I might not even use both.
Now, what I have done is simply move all the sprite parts onto a clean space on the canvas (and I recommend using a large canvas). I have also taken Nido’s tail off in the possibility that I may use it on Blastoise’s body.
This is a view of 100% of my workspace, outlined in white.
I have cut off Blastoise’s tail, on the off chance that I do use nido’s tail instead.
Here, I have gathered all of Nidoking’s spikes to add to blastoise’s shell. A nice thing to keep in mind when spriting is to use very characteristic pieces of the Pokémon you are working with.
Here, I have just touched up the spike a little, taking out little pixels of nidoking color.
What I am going to do now is sort of create a shell to put on the back of Nidoking. These steps are kind of confusing for newer spriters (not that I have been doing this for more than a few months) and some were even made up for this sprite. What I am doing here is taking a piece of nidoking’s back so I can see about how much shell I need to use, because using the blastoise shell is too large and at the wrong angle. I lassoed the area that will be covered by the shell and copied it with ctrl before dragging it away from the nidoking sprite. Notice that I have gotten another sprite, this one with a shell facing towards you, as nidoking's back faces the viewer.
This is an 100 view of the board. (note – all the views are found by going to custom, then zoom.)
A lot of steps in one picture. What I have done is circled the Nidoking shape with the white circle tool, and then drag the white circle onto the Blastoise shell. Then, I dragged this part of the Blastoise shell onto the green background.
What I have done in this picture is draw a rough outline of the shell border around the shell. This makes it look more natural.
Here, I touched up the shell and used a black pencil to neaten up the outline.
Here, I have attached all the spikes to the blastoise shell I have made.
This is an 100 view of the picture.
I have now attached the head to the body by first removing the old head and sticking on the new head. Not shown in a picture is me taking the blue foot and attaching it to the nidoking foot. Recoloring is not shown also.
Here, the jigglypuff in the middle is because I have taken the pink from its body as a starter This is an 200% view.
The sprite is pretty much done. I cleared all the other sprites off the page but the final fusion and the two fusees so I can make a nice equation like thing.
I got the plus and minus sign off of MS word, size 72. It is nice to use big font, because when you enlarge them on paint, they tend to lose their quality.
I dyed the background black to match the background of nightmare and just to give it a more “professional” look, but it can be any color. I also made final touchups to the sprites.
A free tutorial for sprites! (ahem rep, wink wink, nudge nudge
) Happy Spriting!

Lynjabear- Dream

- Posts : 1131
Join date : 2011-02-28
Age : 26
Location : Imaginationland -
![http:// [scroll][img]https://i1082.photobucket.com/albums/j375/wa](https://2img.net/i/fa/empty.gif)
Re: Behind the Scenes - How I make Sprites
by Evan Wed May 11, 2011 11:57 pm
Epic, thanks to you, I spent about an hour trying my hand at this. This is what I came up with. Don't hate, it's my first shot D:
https://s1099.photobucket.com/albums/g387/edgepenner/?action=view¤t=SpriteEdit1.jpg
https://s1099.photobucket.com/albums/g387/edgepenner/?action=view¤t=SpriteEdit1.jpg

Evan- War Veterans

- Posts : 1458
Join date : 2010-09-19
Age : 29
Location : South Cali Bitchez
Re: Behind the Scenes - How I make Sprites
by Aaron Thu May 12, 2011 10:52 am
Dude, that's epic, Evan. It looks like it's holding them. Yeah. I gave Epic rep for this. Incredible.

Aaron- Dream
- Posts : 2076
Join date : 2010-09-26
Age : 27
Location : Central Cali Bitchez
Lynjabear- Dream
- Posts : 1131
Join date : 2011-02-28
Age : 26
Location : Imaginationland -
Re: Behind the Scenes - How I make Sprites
by Lynjabear Wed May 25, 2011 7:38 pm
Why is this sticky? What is sticky?
Lynjabear- Dream
- Posts : 1131
Join date : 2011-02-28
Age : 26
Location : Imaginationland -
Re: Behind the Scenes - How I make Sprites
by Frashu Wed May 25, 2011 8:49 pm
Means that this thread will be seen at the top when someone walks into this Forum. I make very well made important threads Stickies so everyone can see! : )

Frashu- Admin

- Posts : 1121
Join date : 2010-09-13
Age : 27
Re: Behind the Scenes - How I make Sprites
by Lynjabear Wed May 25, 2011 10:35 pm
Thank you for the honor of having my thread sticky
Lynjabear- Dream
- Posts : 1131
Join date : 2011-02-28
Age : 26
Location : Imaginationland -
Re: Behind the Scenes - How I make Sprites
by Frashu Thu May 26, 2011 12:12 am
No problem. It's a help to people interested in making sprites so of course I stickied it : D
Frashu- Admin
- Posts : 1121
Join date : 2010-09-13
Age : 27
Re: Behind the Scenes - How I make Sprites
by Guest Mon Jun 20, 2011 1:54 am
Wow! This is so impressive! Great Job!(:
I love the detail and its very specific.
I love the detail and its very specific.
Guest- Guest
» Behind the Scenes - (recoloring) How I make Sprites II
» Custom FREE Pokemon Sprites!
» make a funny
» Custom FREE Pokemon Sprites!
» make a funny
Permissions in this forum:
You cannot reply to topics in this forum
» y helo, it is i, tito
» Sup, I'm Evan.
» I am the best waifu.
» add me on skype and read me complain about random desu.
» Spam Posting/Reviving Dead Threads
» What Movie Does Nightmare Want to Watch This Spring?
» You know what to do if it happens.
» STR8 IS BACK